Storage
RTIS provides high-performance storage solutions for researchers at the University of Otago. These storage solutions are available on the Research Cluster to all researchers at the University of Otago upon application approval.
Warning
Research Storage
Home directory
All users of the Otago Research Cluster have a home directory that is mounted at /home/<username>. The home storage is intended for storing configuration files, scripts, and other smaller datasets that are used for computations.
The hard quota for home directories is 40GB. When you reach this limit you will not be able to write anymore data to your home directory. A warning will be sent when the you have 30GB of data stored in your home directory.
Note: Home directories cannot be increased in size. Because of the limited storage in your home directory you may need project storage. Email rtis.solutions@otago.ac.nz to request a project directory.
One of the most common issues we see is users running out of space in their home directory. If you are running out of space in your home directory, you can check the size of your home directory by running the following command:
du -ahx ~/ --max-depth=3 | sort -k1 -rh
Projects directory (Ohau storage pool)
Projects storage is organised per department and group /projects/<division>/<department>/<Research_Group>.
The projects storage is high-performance and is ideal for temporarily storing data that is in use for individuals and sharing within groups using the research infrastructure.
Note that this storage is not backed up and is the responsibility of the user to ensure their important data is backed up. We recommend having a copy of your data on HCS, and transferring a copy to /projects/ for working on, then removing this working copy once finished and transferring results back to HCS.
To apply for a projects directory, please fill out the storage-signup-form form.
When to use /projects/ storage
- Intermediate Data Storage
During complex computations, intermediate data or temporary results are often generated.
- Checkpointing
In long-running computations, checkpointing is used to save the state of a job at regular intervals.
- Data Staging
Before running a job, input data can be staged (preloaded) into /projects/ from HCS (or other sources) to ensure that the computation starts immediately without waiting for data transfers from slower storage systems.
- Temporary Data Processing
For tasks that generate large amounts of temporary data, such as sorting, indexing, or image processing.
Warning
Note that the Research storage is not backed up and it is the responsibility of the user to ensure their important data is safe. See Backing up your data for tips. If you need assistance with backing up your data, please get in touch.
Faster Scratch Storage (WEKA Storage Pool)
The WEKA Storage cluster is mounted on the Aoraki compute cluster at /weka/<Research Group> or /weka/<user>. The WEKA platform is a high-performance storage solution ideal for temporary data used in high-performance computing jobs.
When to use /weka/ storage:
- High I/O Performance
Fast scratch storage typically offers higher input/output (I/O) performance compared to regular storage solutions. This can significantly speed up tasks that involve large amounts of data read/write operations, such as simulations, data analysis, and scientific computations.
The WEKA cluster, with its all-flash array and 100Gb networking, is ideal for high-speed data handling and ensures optimal performance for your high-performance computing tasks.
Otago HCS (High Capacity Storage)
HCS is the main data storage pool on the Otago campus. HCS is able to be mounted on desktop and lab computers. It is possible to mount HCS shares on the Cluster Login node to transfer data across but the connection is sub-optimal for high-speed computing and cannot (easily) be mounted across nodes in the cluster. We recommend that you use the HCS for your primary storage needs and transfer your data to your working area in /projects/ when you want to work on it, and transfer results back to HCS for long term storage.
Data transfer
Transferring data between Research Storage (Ohau) and HCS with Globus
Globus is a high-speed, secure data transfer platform that is available to all University of Otago researchers. It is a great way to transfer large amounts of data between Otago HCS and the Research Storage, as well as to external institutes.
Tip
If you do not yet have a Globus-connected HCS share, please fill out the HCS High Speed Data Transfer Service Access Form and wait for ITS to contact you. You will also need to contact RTIS Solutions to have your Research Storage set up with Globus. For assistance, please email rtis.solutions@otago.ac.nz with your university username, HCS share names you would like to connect, and whether you are already a Globus user.
How To Log in to Globus and transfer data
If you have used Globus before, this process will look a little bit different than you are used to, so please read ahead.
You will need to ensure you are logging in to Globus via your University of Otago login.
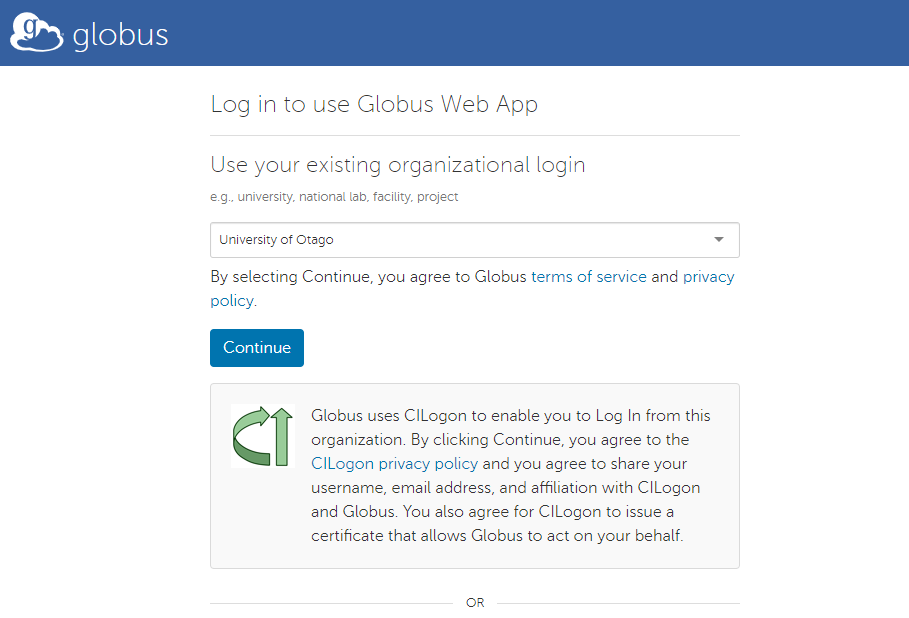
Go to app.globus.org and search for “University of Otago” in the “Use your existing organizational login” section of the page.
This will redirect you to a University of Otago login page. Please sign in with your Otago username and password.
You may be prompted to link any existing Globus identities. Do this if you would like to link a GlobusID account with your Otago account.
Once you are logged in:
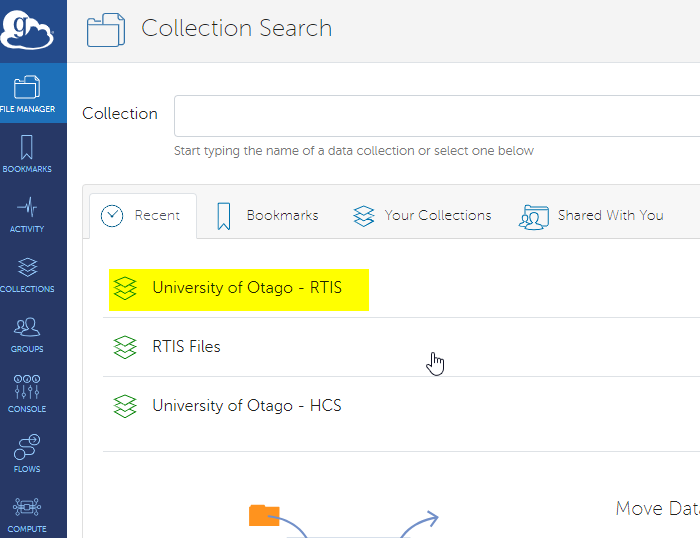
Select the File Manager tab on the left side of the page, and search for “University of Otago - RTIS” in the Collection search box.
Use the RTIS endpoint to connect to Research Storage AND HCS.
Navigate to /fs in the path to find the RTIS-Storage and HCS collections (see image below). University of Otago - HCS endpoint is for off campus transfers and NOT for transfers between Ohau and HCS
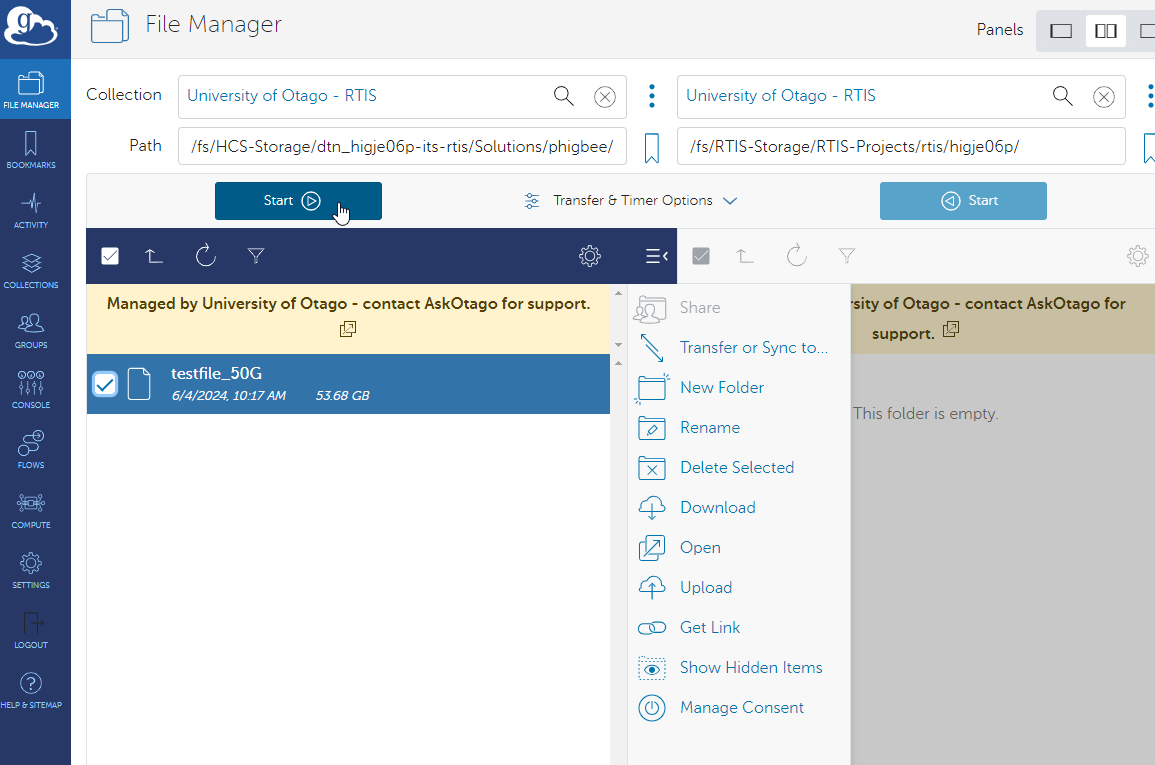
Click on the collection to connect to it, one on each side of the File Manager.
You can now transfer files between the two collections by selecting the Directories or files you want to transfer and clicking the Start arrow in the middle of the page pointing in the direction you want to transfer.
You should then see the RTIS-Storage collection as well as the HCS-Storage collection (with dtn_<username>). Click on the collection to connect to it, one on each side of the File Manager.

You can now transfer files between the two collections by selecting the Directories or files you want to transfer and clicking the Start arrow in the middle of the page pointing in the direction you want to transfer.
Aoraki path |
Globus path |
|---|---|
/home/<account_name> (your home directory: ~/) |
/home-dtn/<account_name> |
/projects/ |
/fs/RTIS-Storage/RTIS-Projects |
/mnt/auto-hcs/<hcs sharename> |
/fs/HCS-Storage/<dtn-sharename*> |
* the dtn-sharename may or may not match exactly to the hcs sharename but should be able to be interpretable.
If you have any issues with Globus, please contact us.
Backing up your data
The Research Storage (anything within /home, /projects, /weka) is not backed up. It is the responsibility of the user to ensure their data is safe. RTIS recommends that users back up their data to the HCS.
Setting up Globus to automatically transfer data between the two storage solutions is a great way to ensure your data is backed up.
If you need assistance with backing up your data, please get in touch.
Transferring Data between Research Storage and your Desktop
Using FileZilla to Upload and Download Files to Aoraki
Installing FileZilla
FileZilla is available for Windows, macOS, and Linux.
Go to the official download page: https://filezilla-project.org/download.php
Download the latest version for your operating system.
Install FileZilla using your platform’s standard installer:
Windows: Run the
.exeinstaller.macOS: Open the
.dmgfile and drag FileZilla toApplications.Linux: Install from your distribution’s package manager or use the provided
.tar.bz2archive.
Once installed, launch FileZilla to begin the connection steps below.
Prerequisites
You will need:
A working Aoraki account.
The hostname:
aoraki-login.otago.ac.nzYour SSH username and password, or an SSH private key.
FileZilla installed (https://filezilla-project.org).
Connecting with Quickconnect
Open FileZilla.
In the Quickconnect bar at the top, enter the following:
Host:
sftp://aoraki-login.otago.ac.nzUsername:
<your-username>Password:
<your-password>Port:
22
Click Quickconnect.
When prompted to trust the server’s SSH host key, click OK.
You will now see:
Left panel: your local computer.
Right panel: your Aoraki home directory.
Connecting Using SSH Keys
If you authenticate with an SSH key instead of a password:
Open FileZilla.
Go to Edit → Settings → SFTP.
Click Add key file…
Browse to your private key file (e.g.
~/.ssh/id_ed25519orid_rsa).FileZilla may prompt to convert the key to a supported format; choose Yes.
Then connect using the Quickconnect procedure, leaving the password blank.
Saving a Permanent Connection (Site Manager)
Open File → Site Manager.
Click New Site and enter:
Protocol:
SFTP – SSH File Transfer ProtocolHost:
aoraki-login.otago.ac.nzPort:
22Logon Type: *
Normal(password), or *Key file(SSH key)
If using key authentication, specify your private key under Key file.
Click Connect.
Uploading and Downloading Files
To upload a file: drag it from the left panel (local machine) to the right panel (Aoraki).
To download: drag files from the right panel to the left panel.
You may also right-click files for actions such as:
Upload
Download
Rename
Delete
File permissions (chmod)
Testing SSH Connectivity (Optional)
If FileZilla cannot connect, verify SSH access from a terminal:
ssh <your-username>@aoraki-login.otago.ac.nz
If SSH works, SFTP in FileZilla should also work.
Troubleshooting
Ensure the protocol is SFTP, not FTP or FTPS.
Confirm port 22 is used.
Check that your university VPN is active if you are off campus.
Confirm your SSH key has correct permissions:
chmod 600 ~/.ssh/id_ed25519
If you receive permission errors, verify your home directory exists and is not full.
Using Globus to Transfer Data between your Desktop and Research Storage
The RTIS Globus endpoint works with Globus Connect Personal and will transfer data to and from your desktop or lab computer.
Note - the **HCS endpoint* does not work with Globus Connect Personal on campus, but does allow you to share and receive data from other Globus users off campus*
To transfer data between your desktop and Research Storage, you will need to install the Globus Connect Personal application on your desktop. Follow the instructions on the Globus Connect Personal page to install it.
Once you have installed Globus Connect Personal, you can connect your desktop endpoint to the RTIS Globus endpoint and transfer data between your desktop and Research Storage.
Mounting HCS on the Login node
For small one job data transfers, you can mount your HCS share on the login node. This is not recommended for large data transfers or for data that will be used in a job as the connection is not optimal for high-speed computing. It can also be mounted on an HPC desktop for smaller data sets and transfers.
To mount your HCS share on the login node, you will need to have a valid Kerberos ticket. If you do not have a valid Kerberos ticket, you can generate one by running the kinit command and entering your University password.
- Otago HCS (High Capacity Storage) shares can be accessed on the cluster provided you have security access and obtain a Kerberos ticket (password authentication).
To access your HCS share: 1. Check if you have a kerberos ticket
klist. If not, obtain Kerberos ticketkinitand entering your University password. 3. Navigate to your HCS share/mnt/auto-hcs/<your_share_name>(the last portion of the HCS address)eg. if my share is
\\storage.hcs-p01.otago.ac.nz\its-rtisthen navigate to/mnt/auto-hcs/its-rtisOccasionally, it may take up to a minute for this access to become available after running
kinit.- Otago MDS storage (Windows Managed Desktop Share) can be access on the cluster if you have a Kerberos ticket.
To access your MDS share: 1. Check if you have a Kerberos ticket
klist. If not, obtain Kerberos ticketkinitand entering your University password. 2. Navigate to your HCS share/mnt/auto-mds/<your_first_inital_of_your_username>/<your_username>(the last portion of the HCS address)eg. if my MDS share is
\\registry.otago.ac.nz\mdr\Profiles-V2\h\higje06pthen navigate to/mnt/auto-mds/h/higje06p
Mounting HCS on the cluster nodes - Auks
The Auks Slurm plugin enables users to save their Kerberos ticket from the login node onto the Auks server. This saved ticket can then be used on any Slurm compute node to access HCS shares. The Kerberos ticket is automatically renewed by Auks and remains valid for up to 7 days. After this period, the ticket must be manually renewed. Once a user saves their Kerberos ticket, the renewal process happens automatically.
Whenever a user logs in to the Aoraki login node using their password, a new krbtgt (Kerberos Ticket-Granting Ticket) is issued. However, if the user logs in via SSH keys or accesses nodes through the OnDemand shell, they must manually obtain a new valid ticket by running the kinit command. When you type your password after running the kinit command, the terminal intentionally suppresses any visible feedback. Confirm your password by pressing Enter key.
For staff:
kinit userx01p@REGISTRY.OTAGO.AC.NZ
Password for userx01p@REGISTRY.OTAGO.AC.NZ:
For students (students have to use domain):
kinit studx012@STUDENT.OTAGO.AC.NZ
Password for studx012@STUDENT.OTAGO.AC.NZ:
A krbtgt (Kerberos Ticket-Granting Ticket) is valid for 10 hours, as indicated by the “Expires” date and time. During this period, the ticket can be renewed using the kinit -R command. This renewal extends the “Expires” time but does not change the “Renew Until” date and time. The Auks system handles this renewal process automatically for the user.
As long as a user has a valid krbtgt ticket, they can communicate with the Auks server seamlessly.
Check if you have a valid krbtgt ticket:
[studx012@aoraki-login ~]$ klist
Ticket cache: KCM:40005987:63840
Default principal: studx012@STUDENT.OTAGO.AC.NZ
Valid starting Expires Service principal
11/26/2024 08:56:14 11/26/2024 18:56:14 krbtgt/STUDENT.OTAGO.AC.NZ@STUDENT.OTAGO.AC.NZ
renew until 12/03/2024 08:56:14

[studx012@aoraki-login ~]$ kinit -R
[studx012@aoraki-login ~]$ klist
Ticket cache: KCM:40005987:63840
Default principal: studx012@STUDENT.OTAGO.AC.NZ
Valid starting Expires Service principal
11/26/2024 11:22:40 11/26/2024 21:22:40 krbtgt/STUDENT.OTAGO.AC.NZ@STUDENT.OTAGO.AC.NZ
renew until 12/03/2024 08:56:14
Ping server to verify connection:
[studx012@aoraki-login ~]$ auks -p
Auks API request succeed
Save current krbtgt on the ausk server:
[studx012@aoraki-login ~]$ auks -a
Auks API request succeed
Now you can use “–auks=yes” option with srun or “#SBATCH –auks=yes” in you slurm batch script:
srun --auks=yes --partition=aoraki ls -lah /mnt/auto-hcs/hcs_share_name
HCS shares are automatically mounted on each node when requested. The user’s krbtgt, retrieved from the Auks server, is used to generate Kerberos tickets for communication with the HCS storage servers. However, obtaining these tickets can take some time. If the HCS share is not yet mounted on the node, the job or script may fail.
To mitigate this, it is recommended to include a command such as sleep 20 in batch scripts before accessing the automounted share.
Generating Auto Renewal Kerberos Tickets
Tip
If you want to keep using your data over hours or days you will need to renew your Kerberos ticket. Kerberos tickets are only valid for 1 hour and then need to be renewed either by generating one via the command line or automatically by generating a keytab file and setting a cronjob to renew the ticket at a specified interval.
To see if you have a valid Kerberos ticket you can type klist
You do not have a valid ticket if you get a message like: klist: Credentials cache ‘KCM:51776880’ not found
You do have a ticket if you get a message similar to:Ticket cache: KCM:51776880 Default principal: higje06p@REGISTRY.OTAGO.AC.NZ
Valid starting Expires Service principal 27/09/23 15:01:57 28/09/23 01:01:57 krbtgt/REGISTRY.OTAGO.AC.NZ@REGISTRY.OTAGO.AC.NZ
*renew until 04/10/23 15:01:57*
- To generate an auto renewing ticket (so as to not expire):
Create a keytab file - replace *username with your otago username:
ktutil
ktutil: addent -password -p
*username*@REGISTRY.OTAGO.AC.NZ -k 1 -e aes256-cts(enter your password)Ktutil: wkt /home/username/username.keytab
Ktutil: quit
To test:
kinit *username*@REGISTRY.OTAGO.AC.NZ -k -t 'username'.keytab
klist(to check if ticket is valid)Then create a cronjob to renew your ticket
crontab -ethen enter the following line to renew your ticket every hour:0 * * * * kinit *username*@REGISTRY.OTAGO.AC.NZ -k -t /home/*username*/*username*.keytabEnsure the permissions on your .keytab file are
0600to keep it secure!
Managing Conda Environments to Conserve Home Directory Storage
To save home directory storage space, it is recommended to create Conda environments in a shared project directory. This approach allows you to manage your Conda environments within your project directory and if needed share them with collaborators. If you do not yet have a shared project directory, please contact RTIS Solutions to request one.
To create Conda environments directly within your project directory (using the --prefix option), follow the guidelines below:
Creating a Conda Environment
Run the following command to create a new environment inside your project’s shared directory:
conda create --prefix /path/to/project_directory/env python
This command is Python version agnostic. To specify a particular Python version explicitly, add python=x.y to the command.
Migrating an Existing Conda Environment
To move an existing Conda environment to a new location:
Export your current environment to a YAML file:
conda env export --name existing_env > environment.yml
Create a new environment from the exported YAML file at your chosen location:
conda env create --prefix /path/to/project_directory/env/conda_envs/myenv --file environment.yml
Activate the newly created environment:
conda activate /path/to/project_directory/env/conda_envs/myenv
Creating an Alias for Easy Activation
To simplify environment activation, consider adding an alias to your shell configuration file (e.g., .bashrc or .bash_profile):
alias activate_myenv="conda activate /path/to/project_directory/env"
Activate your environment using the alias:
activate_myenv
This method is Python-version agnostic and provides a convenient way to manage Conda environments in shared or collaborative project directories.